|
SeaLife DC1000 Elite
Versatile camera/flash package for a dive trip
(by Conrad H. Blickenstorfer; photography by Carol Cotton)
This is a review of the SeaLife DC1000 digital camera that you can use both under and above water. It consists of a standard (but modified for underwater performance) 10-megapixel digital camera and a very tough and intelligently engineered underwater housing. Underwater you can use it to a depth of 200 feet. Out of its housing, it is a small and handy digital camera that you can take and use anywhere. The SeaLife DC1000 with its underwater housing has a list price of US$549.95 and the entire Elite package that also includes a powerful external flash, a wide angle lens and a carry bag lists for US$999.
So what is the DC1000?
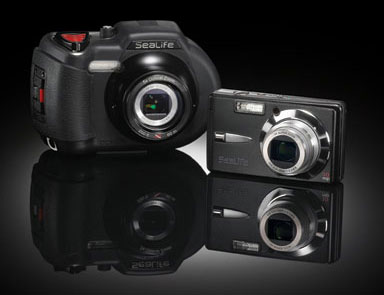
The DC1000 is what SeaLife simply calls an "underwater digital camera." The approach here, however, is different than the one Sealife took with its ECOshot/ReefMaster Mini that we also tested extensively. While the ECOshot is a super-rugged camera that's essentially embedded in a very tough housing, the DC1000 is a system that consists of a standard digital camera optimized for underwater use, and a dedicated underwater housing that can go deeper than the optional housings available for a number of consumer cameras from the likes of Olympus, Casio, Pentax and so on. Below you can see the case and the very compact camera.
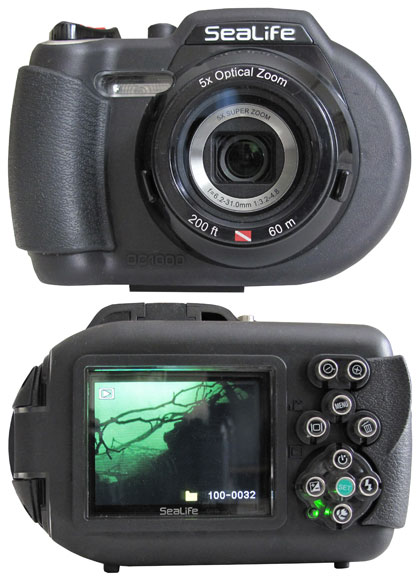
The SeaLife DC1000 waterproof case and the small 10-megapixel camera itself
Take a look at the DC1000 case, however, and it's instantly clear that this is an entirely more serious product. While most consumer camera underwater cases are clear acryllic accented by bright and friendly colors, the DC1000 case is all business. It is a tough, industrial looking polycarbonate affair with extensive rubber overmolding. And the rubber molding is not just for decoration either. It looks as thick and tough as if it belonged on a Caterpillar's tires. There are some stainless steel elements in the front that brighten things up, but this is very clearly a tool for the job. Why does SeaLife go to such lengths? Because underwater it's not just a matter of withstanding water pressure. Cameras also bump against rocks, get dragged along the bottom, and are just generally exposed to much more abuse than above water.
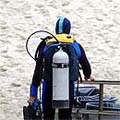
The SeaLife DC1000 housing is individually depth tested to 200 feet, which means it can go a lot deeper than the recommended recreational diving depth limit of 130 feet. It's also been our experience that depth ratings are usually conservative, so tech divers can probably rely on this camera a good deal beyond 200 feet (which, of course, we don't recommend). In a week of testing in Florida's springs, rivers and caverns, we took the camera down to about 100 feet--child's play for this camera.
Despite its tough look and feel, the case itself is very user friendly. Unlike some 2-piece underwater cases that are quite difficult to open and close, the DC1000's is a hinged clamshell with a simple snap. Make sure the thick rubber o-ring is not damaged and that there's no sand, hairs or fibers sticking to it, and then just close it. The case is easy to hold and has excellent grip. The controls are easy to use as well. There are 11 push buttons, all with white on black markings except for Set (green). There is also a standard steel 1/4-20 tripod thread, and a snap-on ring allows mounting of accessory lenses.
When we reviewed the 8-megapixel SeaLife DC800 last year, we didn't have a lot of criticisms. It did exactly as advertised, and once you got used to it, it was easy to operate and took good pictures. I liked the flexible 28-112mm zoom that started wide, loved the tough case, but felt that the camera itself, though modified by SeaLife for underwater picturetaking, was the weaker part of the package. So we wondered whether SeaLife had resorted to higher level hardware with the new DC1000.
DC1000 specifications and features
As far as specifications go, the DC1000 camera itself is your standard modern 10-megapixel digital point & shoot. You get 3648 x 2736 pixel in maximum resolution -- more than enough for cropping, zooming in, and making enlargements.
Resolution, of course, is a moving target and most consumer cameras are now in the 10-14 megapixel range, though the megapixel race has slowed down somewhat. 10-megapixel means the DC1000 is not going to be obsolete anytime soon. You can set the camera to various lower res modes and also vary image compression if storage space is an issue.
The camera comes with 32MB of onboard memory and a SD Card slot that can handle the new large capacity SDHC cards (up to 16GB cards have been tested).
Focal length is 6.2 to 31 millimeters, or 37 to 185mm in the old 35mm film camera parlance. This means you're now getting a full 5X optical zoom that, however, no longer starts at a slightly wide setting as it did with the DC800's 4X zoom.
Movies record at 25 frames per second at 320 x 240 or 640 x 480 pixel format and the camera records sound with movies, even underwater.
Sensitivity, while generally best left in automatic, can be set to 64, 100, 200, 400, 800 or even 1600 ISO. There is a self-timer, exposure compensation, and a 5X digital zoom on top of the 5X optical zoom. The built-in flash has four modes: automatic, on, off, and red-eye reduction.
The normal focus range goes from two feet to infinity (as opposed to a foot in the DC800). A macro range let's you get as close as a couple of inches, and the quick infinity setting gets as close as three feet.
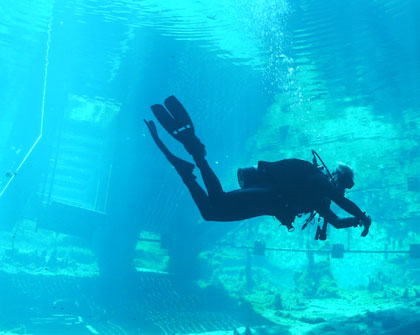
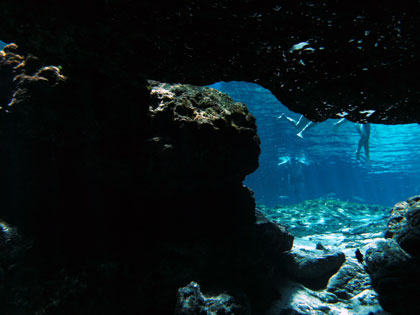
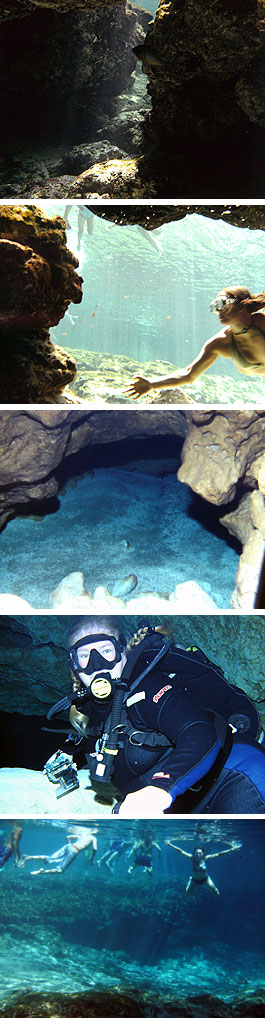
 Flying through the shallow part of Blue Grotto in Williston, Florida, as seen through the wide angle lens. Note the vignetting effect.
The 2.7-inch display is bright, sharp (230k pixel resolution) and large enough. Today's digital cameras, for the most part, no longer have optical viewfinders, and the DC1000 doesn't have one either. Today we depend on the LCD which can be difficult in bright sunlight and at times underwater. SeaLife knows that and lets you crank up the LCD to very high brightness, something that we appreciated very much underwater.
The DC1000 is a point & shoot camera that you set either in automatic mode or one of over a dozen scene modes. The scene modes are:
- automatic
- sea
- snorkel
- external flash auto
- external flash manual
- panorama
- landscape
- sport
- night scene
- splashing water
- flowing water
- anti-shake
- AV (aperture priority)
- TV (shutter priority)
It's easy to overlook the manual AV (f/3.2 and f/5.7) and TV (from 1/1000th to 1 second) modes as they are not described in the brief but otherwise very good manual. Make sure you try them out as proper depth of field can make a huge difference in underwater photography.
In "Snorkel" and "Sea" modes, you get additional white balance modes for shooting in depths of up to 25 feet (default for snorkel) and one for shooting below 25 feet (default for sea). That's because red only penetrates about ten feet and orange disappears at 25 feet, so a white balance that takes that into consideration really matters. SeaLife has been tinkering with ways to handle this phenomenon over the years. In the DC1000, you set white balance by depth and select from:
- Blue Water<25ft (for snorkeling and shallow diving)
- Blue Water>25ft (for deeper diving in "blue" water)
- Green Water<25ft (for snorkeling and shallow diving in water with higher algae content)
- Green Water>25ft (for deeper diving in "green" water with higher algae content)
You can also set the white balance manually (our Elite package included a white balance calibration card for underwater), and we've had very good results with that as well.
The other underwater modes, "External Flash," are used with one of SeaLife's impressive external flash accessories, and those are a must-have for serious underwater photographers. In fact, the company sells the DC1000 in packages that include an external flash and extra accessories. There are the DC1000 Maxx (dual flash, wide angle, travel case, chargers) and the DC1000 Elite Set (single SL961 flash, wide angle lens, soft travel case), which SeaLife sent us for review.
The DC1000 also has a number of different capture modes that, interestingly, are not in the "Capture" menu, but in the "Function" menu:
- Single
- Continuous (up to three images)
- AEB (three shots with exposure bracketing)
- SPY (interval shooting from "fastest" to one shot every hour)
- Cont. Flash (like continuous, but with flash)
- Burst (continuous shooting)
- Pre-Shot (two-step process that lets you select a background, then have someone else take the shot)
- Couple Shot (let's you combine two people into one shot)
- Album Shot (puts three shots into an album-like layout)
To be honest, for the most part these modes are unnecessary, but camera companies are hustling these days to add new features and, hey, one of them just may come in handy. We did check them out, though. "Pre-Shot" is for when you want to predetermine a background that you can then quickly go back to, or have someone else take the picture. It works by taking a faint ghost picture that stays on the screen so you can easily match the background again. The ghost background picture is just for help; it does not actually record. A variation of pre-shot is "Coupl.Shot" where you take a picture of a subject on the left side, then use the ghost to line up and add a second person (like the photographer) into the picture. The two are combined. We weren't very successful at making these tricks work.
Overall, the DC1000 is another example of SeaLife's expertise of taking standard digital camera hardware that can be used anywhere, adding special firmware and settings for use underwater, and packaging the camera with a simple, but first-rate underwater housing and external flashes.
The special underwater white balance modes of the DC1000 can make a big difference in generating more natural looking underwater pictures. It can get a bit confusing to pick the right combination of setting and white balance, and that's why SeaLife added an "easy setup" mode. Pick it and you're asked first if you're shooting underwater or on land. If underwater, it next asks whether you use a flash or just the camera. If flash, that's it. If camera, it asks if snorkeling or diving deeper than 25 feet. If you select "land," that's it, no further questions.
SeaLife external flash system
When it comes to taking pictures underwater, flash is everything. There is a world of incredible color down there, but you cannot always see it because colors are different underwater. Colors are really nothing more than different wavelengths reflected by an object. Underwater, waves travel differently, and some wavelengths are filtered out by water sooner than others. Lower energy waves are absorbed first, so red disappears first, then orange, then yellow. Green stays longer and blue the longest, which is why things look bluer the deeper you go. So if you want to capture all those wonderful colors, you need a strong flash. SeaLife sells packages with a single or a dual flash. Each flash needs four AA batteries. You can use single-use Lithiums which last a long time but are quite expense, or rechargeable NiMH batteries.
Our Elite package came with a single flash (for best possible illumination of subjects you may want to consider a dual flash setup). SeaLife uses an optical flash link that snaps onto the underwater housing. It covers the internal flash window so it can pick up the firing of the camera's flash without letting the internal flash illuminate debris that results in "scatter" on images. The Digital Pro Flash has a pre-flash and an automatic mode switch that can be set to accommodate SeaLife or non-SeaLife cameras. The flash also has an external flash intensity control knob that can be set to automatic or manual control of flash intensity, from darkest to brightest. In our experience, the Digital Pro Flash shot very bright. If anything, we had to tone it down; we certainly never lacked firepower.
While the external flash adds a bit of size and bulk to the camera setup, that's not much of an issue once you are underwater. The flash arm is tightly wrapped in grippy foam and can easily be adjusted.
Allow time to get used to the flash. Getting acquainted with an underwater camera takes much longer than figuring out how things work on dry land. Add an external flash system and the learning curve gets longer yet and it may take a while to get good results. Don't give up, though. Once you get the hang of it, you'll be rewarded with wonderfully rich, colorful pictures.
Shooting underwater
If you're a seasoned underwater photographer you already know that taking pictures underwater is totally different from taking pictures on dry land. Above water, things are fairly simple for a camera: measure light, focus, and shoot. Underwater, there is always less light and so many things move in the water that it is very easy for the camera to become confused and focus on the wrong thing. Water is also not always clear and that can throw off the camera as well. If you use the flash, the bright light from the flash can illuminate particles and debris in the water, resulting in "backscatter," a picture dotted with brightly lit particles. All of this means that the rules of underwater photography are quite different.
 The water at Blue Grotto was like liquid air
Clear water and great visibility are essential, but rarely present. As a rule of thumb, keep shooting distance to 1/10th of visibility. Turn off the internal flash to eliminate backscatter. Forget about the pristine landscapes we all like to take on dry land; underwater it is best to shoot within two and six feet. Another issue is holding the camera still. Above water that's fairly easy but underwater you're weightlessly flying, floating and hovering, so good buoyancy is essential. The DC1000 with its flash is positively buoyant (there is an adjustment weight that you can screw on) and you need to get used to that. Since everything moves, and there may be surge and current to boot, the camera is often hunting for the best possible exposure and focus.
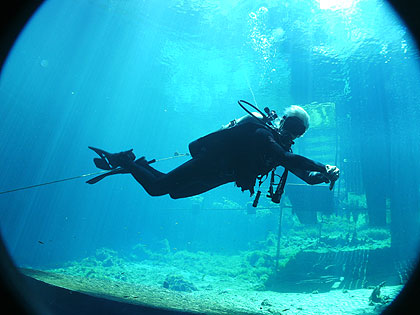
 Watching snorkelers from the "Ballroom" cavern at Ginnie Springs
There were a few things we had to re-learn when switching from the DC800 to the DC1000. With the DC800, SeaLife's advice essentially was to set the camera to landscape/infinity focus. That way everything beyond about a foot and a half was in focus. That's different with the DC1000 as the focus modes have changed.
Focus settings are VERY important when shooting with the DC1000. Here's the situation: For the most part, you'll be shooting subjects that are pretty close. sIf the viz is terrific you can do those stunning scenery shots, but more often than not, you'll be shooting things that are close-by. In fact, with a lot of plants and small fish and other critters, the closer you can get, the better and sharper the pictures.
With the DC1000, that means you need to pay close attention to the focus settings. There are three of them.
- Macro is good from as close as two inches to about three feet (without zoom)
- Auto Focus is good from two feet to infinity (without zoom)
- Infinity works from about three feet to infinity and is fast because the focus is locked to about eight feet and so the auto focus won't spend time hunting.
You can see the problem: Infinity is quick, but you can't get closer than about three feet. Normal auto focus mode lets you get as close as two feet and all the way to infinity, but it's slower and you can't go real close. Macro let's you get real close, but things get blurry past three feet or so.
Acknowledging that and switching the DC1000 into the proper mode is absolutely key to getting sharp pictures!
We did 15 test pictures - five each in the three focus modes -- in a controlled underwater environment, taking the same shot from within inches to a foot, two feet, three feet, and four feet, which is about the range when you're rummaging around a reef or some other interesting macrolife. The table below shows that the fast infinity mode is pretty much out most of the time, and even normal mode means you can't get as close as you'd often like. So experiment with the macro setting as that almost always gets the best pictures as long as you stay within three feet or so.
|
Focus/Distance
|
3 inches
|
1 foot
|
2 feet
|
3 feet
|
4 feet
|
|
MACRO
|
Sharp
|
Sharp
|
Sharp
|
Sharp
|
Marginal
|
|
NORMAL
|
Blurry
|
Marginal
|
Sharp
|
Sharp
|
Sharp
|
|
INFINITY
|
Blurry
|
Blurry
|
Marginal
|
Marginal
|
Sharp
|
If you consider the above, you still need to observe the three primary rules: First, read the entire manual very carefully and figure out how the camera works, exactly. Second, practice, practice, practice. That is more important underwater than anywhere else. Third, don't just take the perfect shots; shoot as many pictures as you can, even of the same subject. The conditions underwater are such that many pics will be junk and you'll delete them later. That is normal and happens even to seasoned underwater photographers (and not just underwater). So, shoot, shoot, shoot.
Additional observation and commentary
One of the things that was easy to overlook in the DC800 was how to operate the mode switch when underwater. There was no control for it when the camera was inside the underwater housing, and initially we thought that was an oversight, and a rather serious one. Well, there was a way to switch modes, but it wasn't obvious, and the instructions on how to do it were buried deep in the manual. The DC1000 still doesn't have a hardware mode switch control on its underwater housing, but the manual now explains how to do it right upfront:
When the camera is in any of the underwater modes, i.e., sea, snorkel, external flash auto or external flash manual, pushing the DISP button will not only cycle through its normal full info, full info plus histogram, no info modes, but add playback and movie modes to the rotation. For just a quick view of the last picture taken, you can push the set/enter button to toggle between shooting and viewing the picture.
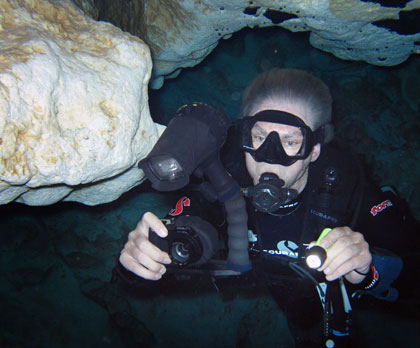
Using the SeaLife DC1000 in the Ginnie Springs "Ballroom"
When reviewing pictures, having a large, sharp display helps, and you can flip 90 degrees clockwise or counterclockwise by pressing the diamond key up or down. However, you can only zoom in to 4X in six steps, which is not always enough to see all the detail.
When using the external flash modes underwater, in manual mode you push Set/Enter to first select the aperture (3.5 or 5.7) and then the shutter speed (from 1/60 to 1/500). In automatic mode, you select from automatic flash, macro flash (less than three feet) or far flash (more than six feet).
You can take video in 320 x 240 or 640 x 480 modes. You cannot zoom during recording (but you can set the zoom level before). Video uses the same underwater white balance settings as still. Switching between video and still leaves the WB setting as is. In darker settings (as in our cavern dives), things seem to slow down and there's a good deal of artifacting.
If you want to add voice memos, you need to set that in the Functions menu. You can then record a 30 second voice annotation immediately after a picture is taken.
In the water, the markings, writing and icons seemed very small and not very legible in low light. The On-Off-Test lever on top of the flash makes little sense. It should just be on and off.
The "Moisture Muncher" cartridges that fit inside the case right above the LCD work great! While other test cameras were rendered useless due to fogging, the DC1000 had no such problems.
The SeaLife DC1000 Elite
What you get with SeaLife's DC1000 Elite package is a small and fairly simple 10-megapixel camera that's been optimized for underwater shooting, a superb underwater case, a tried-and-true underwater flash, a 24mm wide angle lens, plus some assorted cables/chargers/manuals in a nice soft case.
Each underwater camera has its own personality and you need to get used to it. With the DC1000, having the lens start at 37mm equivalent means you have tunnel vision and really need the wide angle lens, which has its own issues (vignetting). And underwater you often have a very wide dynamic range (especially with the kind of cavern photography we did on this trip), and the camera struggles with it. Which means you often have to use exposure compensation to get decent pictures and the effect you want.
If you consider the above, an underwater photography trip with the SeaLife DC1000 will reward you with unforgettable pictures and video from a fantastic world few are ever fortunate enough to see.
We like:
- Handy 10-megapixel camera with excellent underwater case (200 feet depth)
- Without housing, it's a small and handy digital camera for use anywhere
- Tough, rugged housing simple to use and operate
- New "Easy Set-up" menu simplifies settings
- Appreciate the longer 5X optical zoom
- Shutter priority and (limited) aperture priority modes
- Large and very bright display
- SeaLife's optional strobes and lenses
- Very effective "Moisture Muncher" keeps fogging at bay
Keep in mind:
- 37-185mm zoom means tunnel vision; I preferred the DC800's 28-112 that started wide
- Mode switch inaccessible when camera is in underwater case; there's a work-around, but it's confusing
- Need to switch between macro/normal/infinity, or pics are blurry
- Snap-on wide angle lens creates vignetting and at times reflections
- Battery life on the low end of what we'd like to see
- Like all underwater cameras, takes practice to get best results
|


 Above: The SeaLife's DC1000 Digital Elite package that comes in a nice case.

