Bonica supplies a full, high quality and reasonably priced HD video system in a handy travel bag (by Conrad H. Blickenstorfer; photography by Carol Cotton)
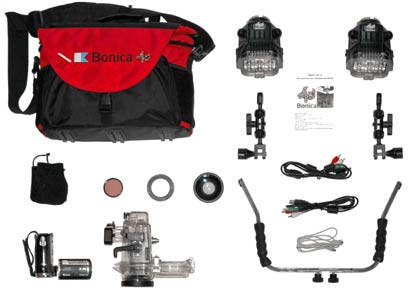
This has become a world where we're taking pictures and shooting video of everything. YouTube, which started as a repository of stuff recorded on TV, is now full of clips people create themselves. A lot of those clips are done with just cellphones. Unfortunately, you can't take cellphones underwater (yet), and that's where Bonica comes in. Bonica is in the market of finding and creating good, inexpensive components for underwater video and then selling the packages with everything you need for a very fair price. In this review we're describing our experiences with one of Bonica's higher end packages that includes a JVC high definition video camera, an underwater housing, two lights with their arms and mounting hardware, filters and adapters, and a nice travel bag.
When shooting pictures or video underwater, a good protective case is as important as the camera itself, and those cases can be quite expensive as well as bulky and heavy. It is not unusual for an underwater case to cost several times as much as the camera itself, and sometimes videographers make up for the high price of a case by skimping on the camera itself. Well, with their JVC-based systems, Bonica manages to offer an excellent balance between a good camera, a good case, and good lights. And then they throw in whatever else you need to end up with the best possible high definition video.
The picture below shows the complete Bonica/JVC system:
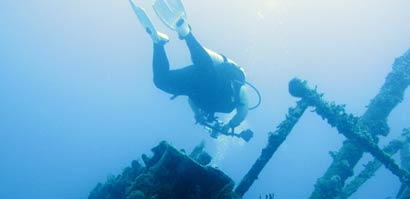
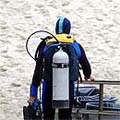
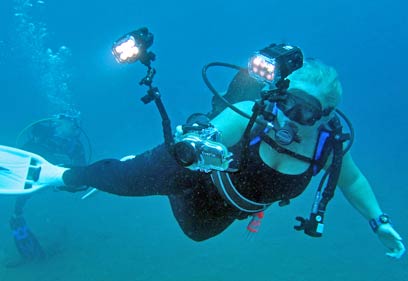
And here is what it all looks like in action on a dive in the Caribbean:
Bonica Snapper HDDV with dual lights on
The camera itself
It is absolutely amazing how much camera technology has advanced over the past few years. A couple of years ago, we reviewed another Bonica underwater video package and marveled how an inexpensive little camera could shoot very good 720P video at a blistering 60 frames per second. Bonica still sells those "Snapper"-based systems that can now do full 1080P video, but the subject of this review is a good step up from the Snapper.
The camera used here is made by JVC, which offers a dizzying variety of ultra-compact video cameras that uses either internal hard disks or Flash memory. The JVC in our review package was a GZ-HM550BU, a very compact handheld capable of recording full 1080p high definition video either onto its 32GB internal memory or onto SDHC cards. The camera can also shoot 9-megapixel still pictures, is full of tricks, and you get a 10X optical zoom. There's even a built-in flash for shooting still pictures. The camera has an automatic mode, which we used almost exclusively, and a manual mode where you can play with scene selections, manual focus, shutter speed, exposure, white balance, metering, effects and macro for both video and stills. So this JVC vidcam is far more than a simple point & shoot.
In fact, what you get with the Bonica/JVC package is really two systems. When used in the underwater housing, operation couldn't be simpler: power on/off, zoom, recording video, shooting stills. On dry land, however, the camera has numerous settings and features you'll want to explore and take advantage of. It's like getting two cameras for the price of one.
As for basic specs, the Everio GZ-HM550BU is a handy, modern vidcam with a fold-out 2.7-inch wide-format display that also rotates 270 degrees, a novel "laser touch" interface that works in conjunction with five touch buttons beneath the display, image stabilization, high speed and time lapse recording, all in an elegant and handy high-gloss body that weighs just over ten ounces. If you delve deeper into the camera and its capabilities, you find cools stuff like an auto recording feature that detects movement, advanced face detection technology, all sorts of things you can do with Bluetooth (transfer stills to a smartphone, use a smartphone to control the camera from a distance, etc), record location data via GPS, one touch-uploading to YouTube and so on.
Just to show how very small these new high-definition video cameras are, to the right you can see a comparison of the camera used in the Bonica/JVC package with a mid-1990s' style Sony Video8 Handycam. In its time, the Handycam was considered extremely compact and a miracle of efficiency. How times change. Apart from great advances in miniaturization, the JVC benefits from recording onto Flash memory or SD storage cards, without any need for a bulky old-style motorized tape cassette assembly.
Underwater case system
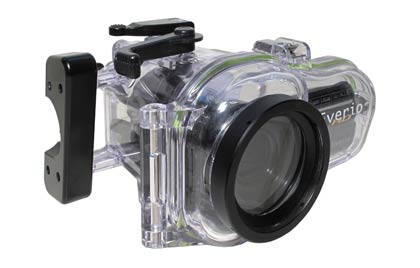
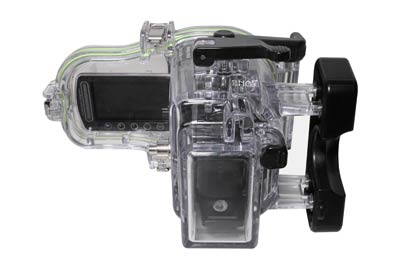
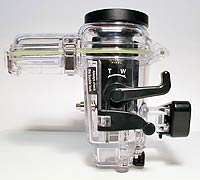
The Bonica/JVC system comes with an underwater case designed especially for this camera. It is the JVC WR-MG270 Marine Case, a clamshell design made of clear polycarbonate that can handle depths to 130 feet, which so happens to be the recommended depth limit for recreational scuba diving. The housing is a clamshell design that uses three strong metal clasps and a greenish-yellow O-ring to keep water out. Unlike the Bonica "Snapper" system that uses an electronic remote control inside the housing to access most system functions, the JVC housing only lets you access the very basics: power, zoom, snapping stills and recording video.
As a seasoned provider of underwater video systems, Bonica knows the importance of keeping things as small, handy and practical as possible. This may be the reason why they chose the JVC cameras and cases for their underwater video packages. For example, the case accommodates the fold-out LCD by being form-fitted around it. And the case leaves enough room around the video display to let you rotate it about 30 degrees for a viewing angle that feels comfortable to you when diving. Good thinking. Below you can see the camera in the housing from the front:
Note the large zoom and snapshot controls on top of the housing. They make operation very easy, and the very large labels next to them help remember what these controls do.
Below is the whole assembly from the rear. You can get a good view of the LCD so you can see what you're taping. The black button to the right of the battery case starts and stops video. The black handle on the right side is one of the weaker parts of the case. It's hard and not very ergonomically shaped. On the other hand, the case is large enough to accommodate an extended life battery, which is a good thing as the standard battery only lasts 45 minutes of recording or so.
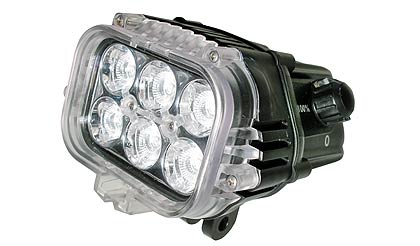
Light, as any photographer and videographer knows, is important to getting good results. Underwater it is absolutely crucial! If you want to shoot good pictures and video underwater you need the best lights possible. Fortunately, the lights that come with the Bonica/JVC package are up to the job. They are impressive-looking and very solid aluminum/polycarbonate designs with six LEDs each. These lights can crank out 1,500 Lumen and burn for a full hour at maximum intensity. Within their 60 degree coverage angle there is no hotspot, which means everything is evenly lit. Each light has two controls. One knob either turns on full power or sets it to adjustable power. A second knob lets you set intensity from 10 to 100%. Color temperature is 6500 degrees, which approximates daylight. Each light takes eight AA NiMH rechargeables, so make sure you bring along enough chargers! The lights, by the way, are rated to a maximum depth of 180 feet.
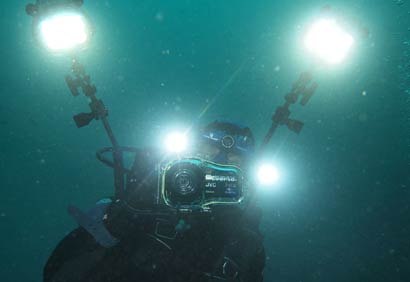
Below you can see the Bonica/JVC camera system with the lights in use during a dive. This was a dive in murky water and so I also used two additional head-mount lights.
The full Bonica/JVC setup with dual video lights
Setting up the lights and camera
Putting together a full underwater camcorder setup is a bit more involved than simply putting the still camera into its case. Before you do anything else, make sure you know how to operate the camera and that it is set properly. The JVC camera boots up into automatic mode, so there isn't much to set unless you want to shoot in manual mode, which is not really recommended since you cannot manipulate the menus once the camera is in its case. Make sure you know whether you want to record on internal memory or onto an SD card; you don't want to run out of space during a dive!
The JVC camera has a special mounting shoe to secure it inside the housing. Make certain that the battery you're using is fully charged. The standard battery isnt very powerful and we strongly recommend getting the double or triple capacity battery; underwater you can't just simply carry along a spare.
Another thing to consider is fogging. Shooting video underwater means the camera and housing will be subjected to very different temperatures and a lot of moisture and humidity. The JVC Marine Case manual suggests using both anti-fog liquid and a drying agent. That's important. There's nothing worse than filming the dive of your life just to find out later that your lens was fogged up!
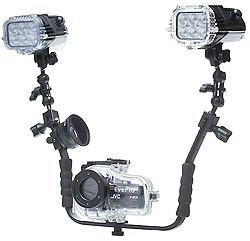
Setting up the video lights requires some assembly also, especially when you travel and need to disassemble your gear. The main bracket consists of two parts so that the Bonica can be operated with either one or two lights. That requires a Philips screwdriver, so make sure you have one handy at the dive location. The bracket arms are made of aluminum and are marvelously light compared to some of the gear we've tested in the past. Ball joints allow them to be twisted and rotated at any angle and in any direction. The balls are hard plastic with grooves for rubber rings that provide the necessary friction. They don't grip quite as well as the rubber balls used in RAM-Mount systems, so you need to tighten them pretty hard to keep them from flopping. The attachment fixture on the lights is sturdy enough and the clamp has a metal insert. The ball joint extension is pretty much needed so you can adjust your lights as required. They remain, however, a weak point not just because of the lack of friction in the balls -- one of ours actually broke during a dive.
A video system that includes two lights adds to your travel bulk, but the full JVC/Bonica setup is still fairly light and everything fits into the bag that comes with the package. On land the small size and light weight of the JVC vidcam means you can take it almost anywhere. Under water the camera in its housing is positively buoyant. This means it won't ever drop to the bottom, but it also means you need to make sure it doesn't escape to the surface and you may need an extra pound or two of weight on your weightbelt or weight-integrated BC. However, if you use it with the two video lights, the overall system becomes negatively buoyant.
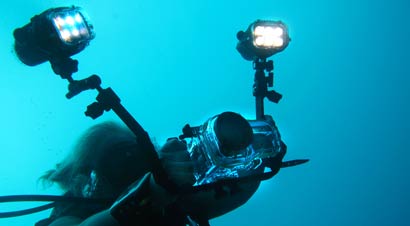
The full Bonica/JVC video/still camera system with dual lights
While traveling, Carol had the following observation: "Bonica has a very nice bag to carry everything in, however, there is one thing I'd like to suggest. On the back of the bag there is a large zippered pocket. I would like to see a zipper along the bottom of that pocket so the bag could actually be carried on top of a wheeled carry-on bag while being secured over the telescoping handle."
Going underwater
Camera controls on the Bonica/JVC setup are as simple as can be. They are also large enough to be operated even with thick gloves on. There is a big lever for the zoom (which we don't recommend using much; it's hard enough to hold a camera under water still enough for good video as is). Behind it is a very large shutter for taking stills. A smaller button at the back starts and stops video recording. Buttons are clearly marked in large white text and they are easily reachable. The one big problem with the controls is that you cannot access camera settings other than turning the camera on and off.
Shooting video is very straight-forward. Stills requires a bit of getting used to as you have to remember to stop recording video before you can take a still shot.
Overall, we did over 20 full dives with the Bonica/JVC on a liveaboard trip to the Caribbean islands of St. Kitts and Saba, and in the Pacific off San Diego and the Coronado islands. We used it both with and without the video lights. The camera is compact enough to handle well and letting you get close to a subject more easily than with bulkier underwater camcorders. Do make sure that the camera display is tilted upward (or whatever angle works best for you) as the vertical viewing angle of the LCD is fairly narrow and you need to look at it head-on for the best picture.
We did encounter a couple of problems. One time we had the lens fogged up because we had failed to use the recommended anti-fog and moisture-muncher. They are not always necessary, but under certain conditions (large temperature and humidity changes, for example), they are essential. We also had one of the ball joint arms break. That was the bad news. The good news was that it happened as we returned from a dive while handing the camera back to a waiting dive master on the boat, so the light did not drop into the abyss.
We had had high hopes for the wide angle lens that came as part of the package. It screws on to the front of the housing lens dome, but somehow we always ended up having the inside of the lens getting fogged up. Getting rid of fogging is usual trial and error, and so we don't blame the lens. Fortunately, the JVC's lens starts fairly wide as is, so the wide angle add-on isn't totally necessary.
Balancing the system
Anytime you go underwater with a camera it's different from doing a dive without it, and that's especially the case when your rig has two big lights. You quickly find out that proper balance and buoyancy is important for comfortable use and handling. With the two video lights the Bonica/JVC setup is negatively buoyant and quite top-heavy. On my first dive with it, the assembly wanted to tip over forward, making it difficult to handle the camera. When I got back up on the boat, I readjusted the balljoint arms so that the center of gravity of the lights was exactly above the handles. This way, the system was much easier to handle underwater. It's also possible to configure the lights so that the overall center of gravity is closer to the camera, which improves handling. An inherent problem as that the lights were negatively buoyant and wanted down, whereas the camera housing was positivly buoyant and wanted up. Easy to get used to, though.
Since the lights have a limited burn-time, and since you don't want to blind your fellow divers, there must be an easy way to turn video lights on and off. This was a criticism we'd had with Bonica's older lights for the Snapper which had a push button that cycled through off/on/different intensities. That made it difficult to figure out if the lights were on or off. The new lights have large knobs that make turning on and off easier, but there isn't a clear indicator (a light or easily visible dial) and so you still have to look at the light or hold a hand in front of one to see if it's on or off.
Why do we talk so much about the lights? Because good lighting is absolutely essential for underwater video and photography. Beneath the surface you hardly ever have enough light, and as you go deeper colors disappear, first red, then orange, then yellow. So in order to get vibrant, colorful underwater video, you need as much natural and artificial light as possible. You can shoot without video lights, but everything will look flat and greenish. Light is the key to good underwater video, even with a camera as good as this JVC.
How did it come out?
What expectations should you have from a HD video system like the Bonica/JVC? In theory, 1920 x 1080 video is as good as it currently gets. It's the same resolution used for that glorious HD video on televion, the one where you feel you're actually at the ballgame and can see every tiny little detail. Good 1080p HD video can make even older movie theater films look grainy and flat, and now it's available in cameras that fit into the palm of your hand, or in this case, a compact handy underwater housing.
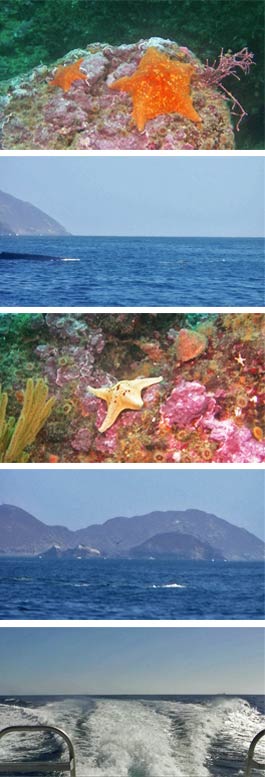
The answer is, as almost always, "it depends." It depends on how much light you have on a dive, what the visibilty is, whether you're holding the camera reasonably steady, and whether you've learned how the camera works best. At its best, the Bonica/JVC produced stunningly clear and beautiful video and also excellent quality stills. The camera's focusing system worked very well, and sharpness was hardly ever an issue. All the pictures in the image bars on the right were shot with the Bonica/JVC (except the ones where the camera is in it, of course).
Getting the video from the vidcam to a Mac or PC can be confusing. For the most part, people are used to .AVI files on the PC or .MOV video files. Well, the JVC uses files with the .MTS extension, which is something Sony and Panasonic cooked up and is often used with the AVCHD (Advanced Video Coding High Definition) developed for camcorders. For us, that meant we couldn't just copy the video files from the JVC to the Mac and play them there. For that, we first had to load and open-source VLC media player (from here), and later we installed the Mac Video Converter from iSkysoft (see here). The JVC actually has settings for generating YouTube-suitable video ("UPLOAD SHOOTING") and video for loading into iTunes ("EXPORT SHOOTING"). You can make the JVC appear as a drive and then copy the .MTS files from it, but they can only be imported into iMovie directly from the camera via the "Export to Library" function in the camera's USB menu. It all eventually works, but it is not trivial and I wish there were fewer standards.
Compared to Bonica's lower end Snapper systems that use an Aiptek camera, the JVC is better able to handle reflections, contrasts and high dynamic range situations. The JVC also does quite well in low light, but having adequate light is always better underwater. While this means better overall video quality, our recommendation remains the same:
In order to get the best possible video (and stills) from this very reasonably priced system, observe these rules.
Always use as much natural or strobe light as possible. This is the only way to get good color in an underwater environment.
If you have a choice, do your video recording on bright, sunny days so you get as much ambient light underwater as possible.
Use the proper filters (our package came with two); they can compensate a bit for the colors lost at depth.
Move around as little as possible. The best video results from holding the camera totally still and have the scenery move instead.
Plan on spending several hours reading and comprehending the manual. There is an awful lot to this JVC camera that is not immediately obvious, or it is buried deep in menus.
How about still shots? They can be excellent. Until a couple of years ago, any camera that used a CMOS imager, as this JVC does, was unable to create high quality pictures. That has changed dramatically as more and more cameras are using CMOS imagers instead of the CCD imagers that have been used in almost all digital cameras. In fact, the JVC is capable of taking high-res pictures that rival and surpass those of dedicated point & shoot cameras.
Born for big-screen HD TV
You can connect the JVC camera directly to an HDTV via an HDMI cable, you can do some rudimentary editing in the camera, you can burn video directly to disk from the camera, etc., but it is really by far best to handle editing in something like iMovie on the Mac or a PC equivalent. You can then burn a DVD or Blu-ray disk for viewing on an HDTV, and that is where you get the full reward for using a high definition camera. The video we recorded with the Bonica/JVC looked absolutely gorgeous on the big screen. HD is really made for those big TVs, so don't even bother viewing video on the tiny LCD or on a small netbook or some such.
We created several movies in iMovie HD on the Mac. We picked and edited scenes and spliced them together into a longer movies that we then burned onto DVDs, using iDVD on the Mac. We then played the movie on a 52-inch High Definition LCD TV in 16:9 format. The result was stunning. The video ran smooth and lifelike, video resolution and quality was exceptional, and audio was excellent.
Below is a video of Bonica/JVC video playing on a big screen:
The incredible advance in HD video
When I look at video shot with this Bonica/JVC setup, I marvel at the sheer video quality it is capable of. If you follow the rules of underwater videography and have figured out the "sweet spots" for this system, you're rewarded with clear, vibrant video bursting with color. It's better than anything you'd see on conventional TV, and often better even than the commercial stuff you see on HD TV. Compared to what a modern 1080p vidcam like the Bonica/JVC can do, older underwater footage looks grainy and quaint, even that done with professional equipment. That's because we've seen a imaging revolution where advanced video compression technology is making high definiton recording readily available for all to explore and enjoy.
Huge advances in storage technology mean you no longer have to deal with cumbersome tapes or discs. Even using the highest quality (UXP) recording mode, the internal 32GB memory is good for 3 hours of recording. In the still very acceptable XP and SP modes you get four and six hours of 1080p HD video, respectively. For stills, the internal memory can hold almost 8,000 9-megapixel pictures even in the fine quality mode, and almost 2,000 fit on a readily available inexpensive 8GB SD card. Storage limitations simply aren't an issue any more.
If you go online and read what people have to say about the camera itself, you find the usual variety of opinions. The folks at G4TV's Gadget Pr0N did a fun video review of the JVC GZ-HM550 here.
Summary
With their JVC-based package, Bonica offers a modular underwater high-definition video camera system that can record full 1920 x 1080 pixel video at up to 60 frames per second for excellent 1080p playback on a HDTV, and also shoot 9-megapixel still pictures. The package strikes a good balance between a feature-rich, versatile and handy HD video camera, a very well made underwater housing good for 130 foot dives, and powerful LED lights with very even coverage. The setup is very easy to use and produces excellent HD video as well as very good still shots from its 10.6-megapixel CMOS imager. 32GB of internal flash storage and a SDHC card slot mean you have plenty of recording capacity.
Bonica/JVC HD video underwater system
We like:
Very good and sharp 1080p (1920 x 1080 pixel) high definition video
Excellent, well-made underwater case for dives to 130 feet
Very simple operation
10X optical zoom and image stabilization
You can shoot video and still pictures
Can shoot excellent 9-megapixel still pictures
Has 32GB internal Flash and a SDHC card slot
Extensive manual modes and numerous features (including high speed and slow motion)
Camera small and handy; still handy even inside case
Powerful LED video lights
High quality case, lights, filters and accessories
Not so much:
Menu functions not accessible when camera is in case
Deep complex menus tend to bury important features
Bonica JVC HD still pics: Diving St. Kitts and Saba in the Caribbean
Bonica/JVC HDDV pictures -- The still images above were taken during dive trips to Saba/St. Kitts. Pictures by Carol Cotton and Conrad H. Blickenstorfer.
Specifications Bonica / JVC HDDV
Status
Added 10/2010
Camera Type
HD camcorder with underwater housing
Camera Model
JVC Everio GZ-HM550BU
Water Protection
Underwater camera case rated to 130 feet
Size
4.5 x 2.0 x 2.5 (camera only); 7.5 x 7.0 x 5.0 (housing largest dimensions)
Weight (oz.)
2.7 lbs. with standard battery (camera + housing); 10.5 oz. camera + battery only


 Bonica Snapper HDDV with dual lights on
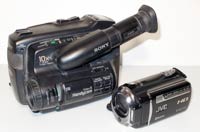 the camera used in the Bonica/JVC package with a mid-1990s' style Sony Video8 Handycam. In its time, the Handycam was considered extremely compact and a miracle of efficiency. How times change. Apart from great advances in miniaturization, the JVC benefits from recording onto Flash memory or SD storage cards, without any need for a bulky old-style motorized tape cassette assembly.
 The bracket arms are made of aluminum and are marvelously light compared to some of the gear we've tested in the past. Ball joints allow them to be twisted and rotated at any angle and in any direction. The balls are hard plastic with grooves for rubber rings that provide the necessary friction. They don't grip quite as well as the rubber balls used in
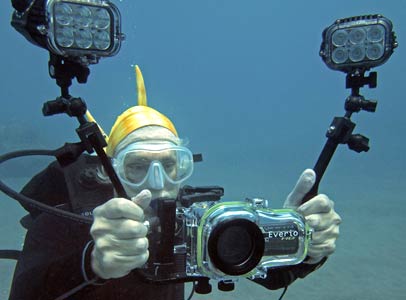
 The one big problem with the controls is that you cannot access camera settings other than turning the camera on and off.